There are a lot of great ways to collaborate on tracks using Splice. In addition to sharing project files and folders you can also share audio stems within DAWs among users. This is great for a variety of reasons, such as: cross-platform work (ex. Live users who want to work with a Logic user), for when collaborators don’t have the same plugins, and for when the project owner doesn’t want to share too much information about how he or she produces but is still interested in collaborating.
Before we can share stems there are few important steps to follow in order to properly prepare your projects. We’ll discuss some general things to keep in mind, then address how these things play out in different DAWs such as Ableton Live, Logic Pro X and FL Studio.
1) Consult Your Collaborator
Whenever planning on working closely with another artist it’s a good idea to talk about a few things, such as: the style and arrangement of the project, how to handle third-party plugins (like reverb, delay and echo), and how to approach tracks with automation. A little pre-planning will go a long way to avoid headaches down the line.
2) ‘Save As’ Before You Stem
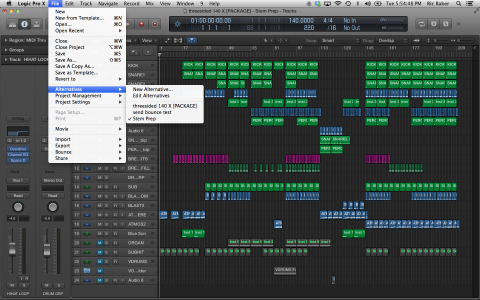
In order to properly prepare your project for stemming you should create a copy or ‘save as’ so as not to destructively edit the original project. LOGIC PRO X: Use the ‘Alternatives’ options to create a version of the track within the same project.
ABLETON LIVE: Select File -> ‘Save As’
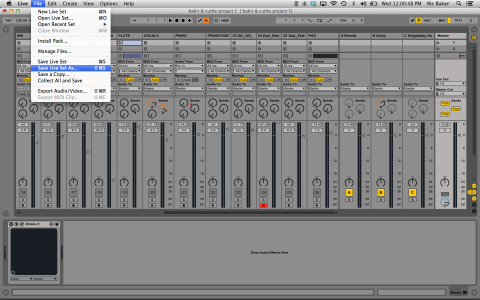
Use ‘Save As’ in Live
3) Delete Muted and Unused Tracks
Deleting these types of tracks is good for organization and it will make the project smaller and easier to share. It will give your collaborator an easier overview to work with and will hopefully save some time.
4) Bypass Some Effect Plugins
Refer to your discussion with your collaborator to figure out which effects you want to leave on for the stems, and which ones you want to bypass. For example, are you ready to stem out your bass with EQ and compression at this point? Remember, you are working from a copy so try a few things out.
5) Delete Automation
It can be premature at this stage to send stems with automation printed on them. Make sure to go through your tracks and decide what to include and what to remove based on your previous talks with your collaborator.
LOGIC X PRO: While looking at the Main window hit the ‘A’ Key to bring up the automation information for each track. If you see automation you’d like to remove go to the Mix Menu, choose Delete Automation -> Delete Visible Automation on Selected Track.
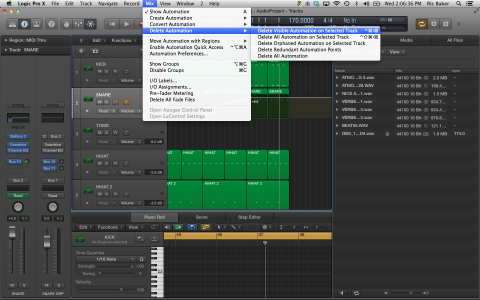
Delete Visible Automation in Logic
ABLETON LIVE: To delete all automation data, right-click or control click on an automated control to open its context menu and select Delete Automation. The automation LED disappears, and the control’s value stays constant across the entire Arrangement timeline and in any Session View clips. You can also delete selected portions of automation by editing breakpoint envelopes.
6) Consolidate Tracks
Are there any tracks that can be consolidated before you share your stems, such as layered drum parts that only ever play at the same time or other elements that never play apart from one another? It’s great to give your collaborator just what they need so they can get down to work quickly. Once you’ve consolidated your tracks, make sure to delete the now unused ones.
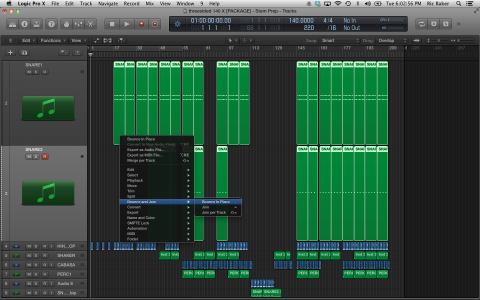
LOGIC PRO X: Choose all the regions you wish to consolidate and Control-click. From the menu choose Bounce and Join -> Bounce In Place. You will be given the option to bypass insert effects and how you want to handle the tracks after you finish bouncing.
ABLETON LIVE: There are a few different ways to do this in Live. The easiest way is to group the tracks together you want bounced out as one stem. Highlight the tracks you wish to group and hit Cmd + G. When you go to bounce out your tracks, the output of the group will be included as a separate stem.
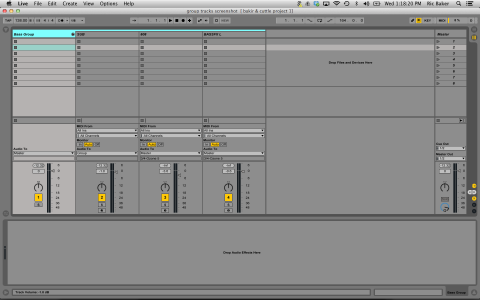
Group Tracks In Live
7) Bouncing Your Busses As Stems
If you’ve used a lot of busses in your project, especially with send effects, you may want to include them as separate stems.
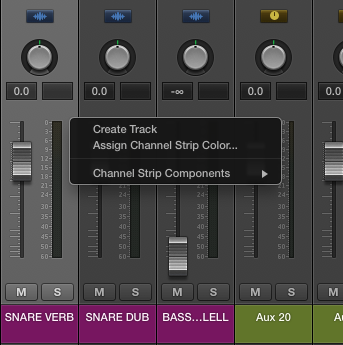
LOGIC PRO X: Make sure to create a bus track in your arrange window for each bus you want stemmed out separately. In the mixer, select the bus track you wish to bounce and Ctrl + Click. On the menu select ‘Create Track’ to make a track for the bus in the main arrange window. When you Export your stems, the audio output of this track will be included as a separate stem.
ABLETON LIVE: Your busses will be automatically bounced out as separate stems.
8) Export Your Tracks As Stems
After following these steps you are now ready to export your tracks as stems. Follow the instructions below.
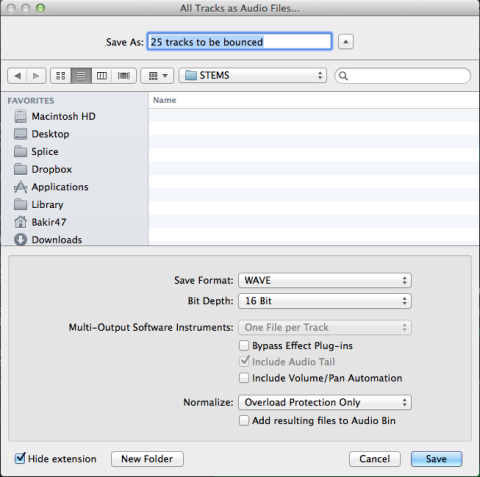
LOGIC PRO X: File -> Export -> All Tracks As Audio Files
The following window will appear. You can now choose your preferred file format, bit depth and wether or not to bounce your stems using the insert plugins you’ve loaded in your tracks.
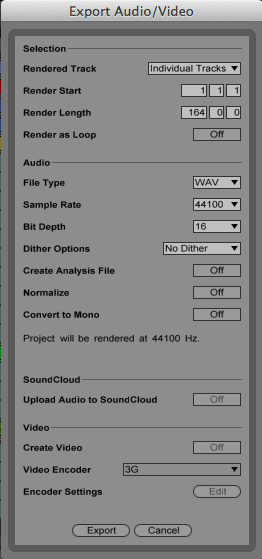
ABLETON LIVE: File -> Export Audio/Video
The Export menu will appear. Here you can choose which tracks you wish to bounce
EXPORTING STEMS IN FL STUDIO :
Exporting Stems from FL studio (all individual tracks) is fairly simple as long as tracks are properly routed to assigned channels in the mixer. Once all channels (midi and audio) are assigned to individual mixer tracks stems can be exported by following steps:
File > Export Wave File > Select Directory/destination folder > Rendering options menu will appear (make sure “Split Mixer Tracks” is turned on in the options list (Fig.1.1)
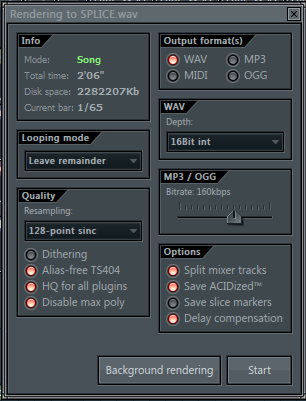
> Press Start
Following these steps will make exporting and sharing stems with your collaborator much easier, unlocking unlimited creative opportunities. Keep these in mind as you work with Splice!
August 26, 2014